Shareable Preview links enable the creation of a link that provides access to a draft project in SPP without the need for the user to login.


How To's

Creating a Shareable Preview Link

This is mostly used to share a private and draft projects to a select number of people creating them is fairly easy! Here's how:

  1. Go to Dashboard.
  2. Click on 'Projects'. Use Search to find the project you want to create a preview link for.
  3. Select the "Preview link" option for that project.
  4. A window will appear click on the "Create link" button or the "Generate Link" hyperlink.
  5. A new Window will appear that will prompt you to set the following and click the create link button and feel free to share.
    • Link Name: Sets the name for the preview link
    • Expiry Date: Set the expiry date within the 14 day timeframe
    • Access Limit: Allows you to set the number of maximum times the link can be accessed.
    • Restrict access to Allowed IPs: This options allows you to only provide access to certain IP Addresses that are whitelisted or approved on your end.


⚠️NOTE: Any contributions submitted via the Preview Link will appear in your reports once the project is published.

Sharing draft sub-pages or news pages?

There are some circumstances where a page is already published, and you may only need to share a new draft sub-page. Perhaps you have a news page that needs to be reviewed before being sent out? You can create shareable links for these pages too.

How to share a link for a draft sub-page or news page:

You will need both the preview user share link and the draft page URL you want to share:

  1. Create the preview share link for the project as you would normally.
  2. Then copy the URL of the draft page. Send both links to your intended audience
  3. The user will first need to enter the preview link URL - this authenticates them as a preview user
  4. Then they can access the draft news page via the draft page URL.

🎯Key Actions

If you want to expire a link immediately, you can do so at any time by going to the preview link option and then select the more option ( ⫶ ) on the preview link modal and choose delete:


Anyone with the link can simply click it and access the draft project. This also means you should think carefully about who will have access when you share the link. If you are concerned the link has been shared further than you intended you can delete the link (below) and create a new one.

When you generate a preview link, it will automatically expire 14 days after it’s created. This default expiration helps keep your content secure.


New: Set Your Own Expiration Date

You now have the option to set a custom expiration date when creating a preview link.

  • The default expiry is still set to 14 days from the creation date.
  • You can choose a different expiry date using a date picker.
    • The date picker won’t allow you to select a date more than 14 days in the future.
    • It’s enabled by default, so you can set your preferred date right away.


Extending a Link

If a preview link hasn’t expired yet or has expired, you can extend its expiration by going back to the link modal, select the more option ( ⫶ ), click edit settings and choose a new date.


  • The new expiry date must be within 13 days of the day you make the change (which keeps the total period within 14 days including today).


You now have more control over who can view a preview link and how often it can be used. This helps improve the security of your content by limiting unwanted or excessive access.

New: Set a Maximum Number of Uses

In addition to the expiration date, you can now limit how many times a preview link can be accessed.

  • A new option called “Access Limit” is available in the link settings.
  • This feature is optional and disabled by default.
  • When enabled, you can set a specific number of allowed views for the link.

Important Notes:

  • The expiry date is still required and always applies.
  • A preview link will expire when either the expiration date is reached or the access limit is used up—whichever comes first.

You now have greater control over who can access preview links with the introduction of IP Address Restrictions. This enhancement adds an extra layer of security by allowing admins to limit access based on whitelisted IPv4 addresses—ensuring only users from approved locations can view sensitive content.


Configuring an IP Whitelist

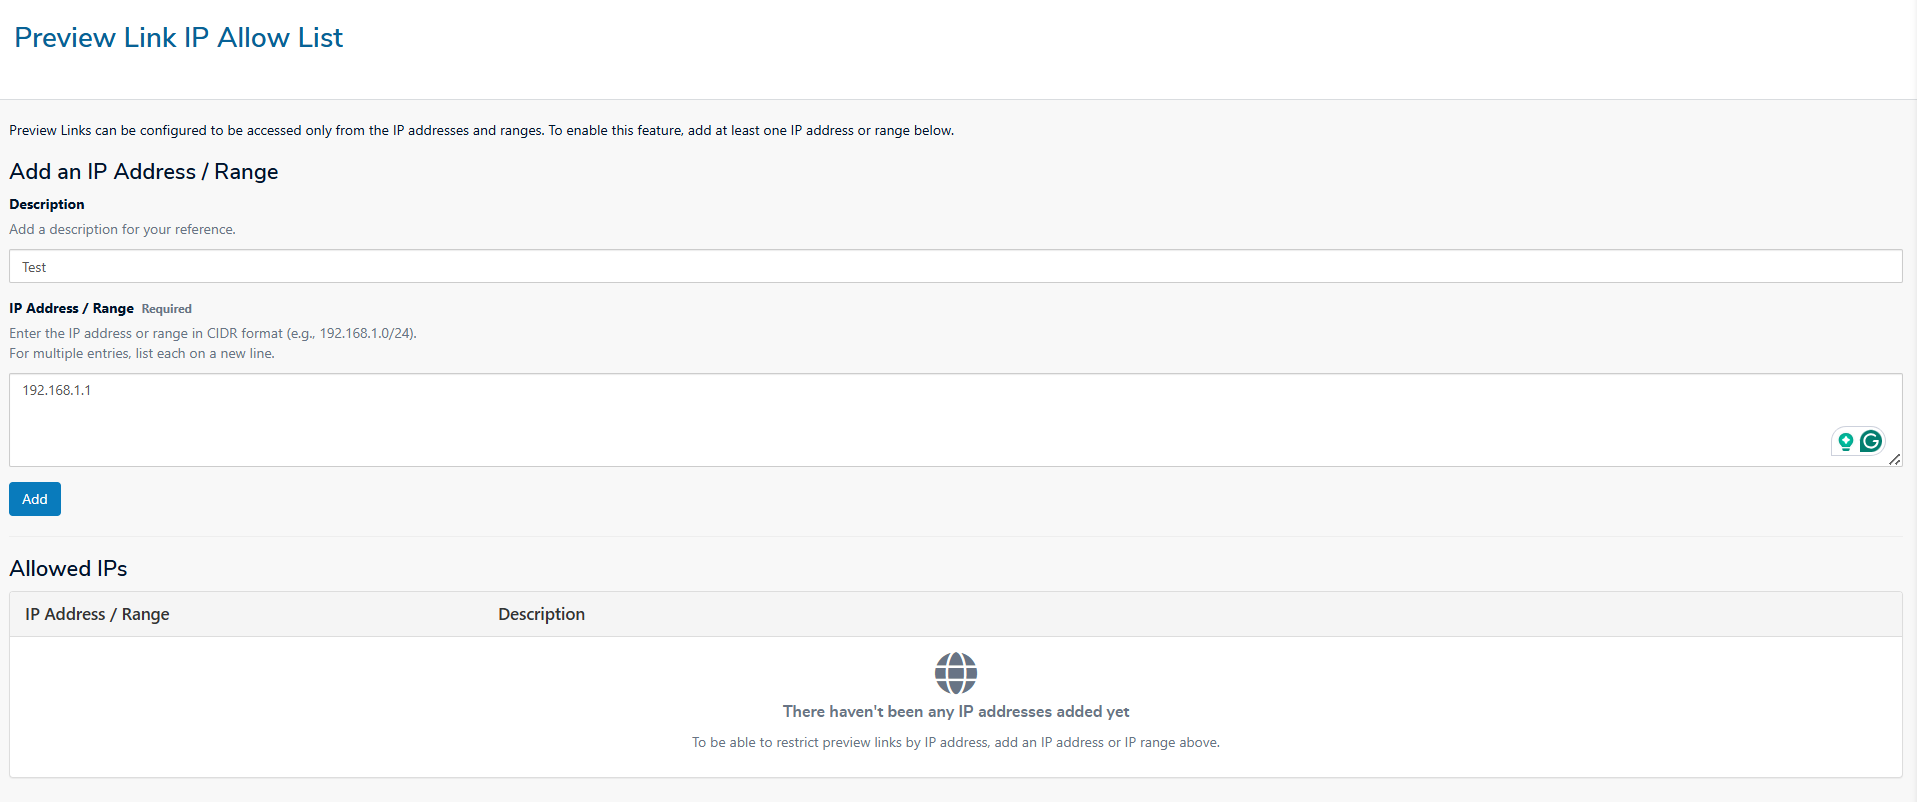
To configure IP restrictions for preview links:

  1. Go to Dashboard > Settings > Projects.
  2. Locate the section titled “Preview Link IP Allow List.”
  3. Add the IP addresses you want to allow access for.

You can configure the following fields:

  • Description (optional): Add a note or label for easy reference.
  • IP Address / Range (required): Enter individual IPv4 addresses or CIDR-formatted ranges
    (e.g., 192.168.1.0/24).
    For multiple entries, place each on a new line.


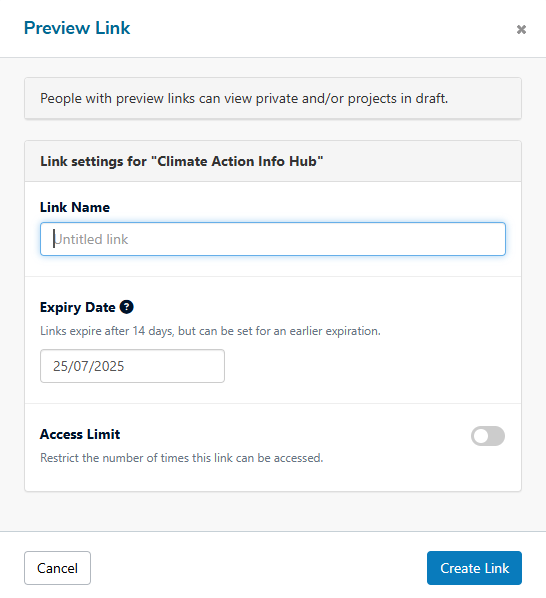
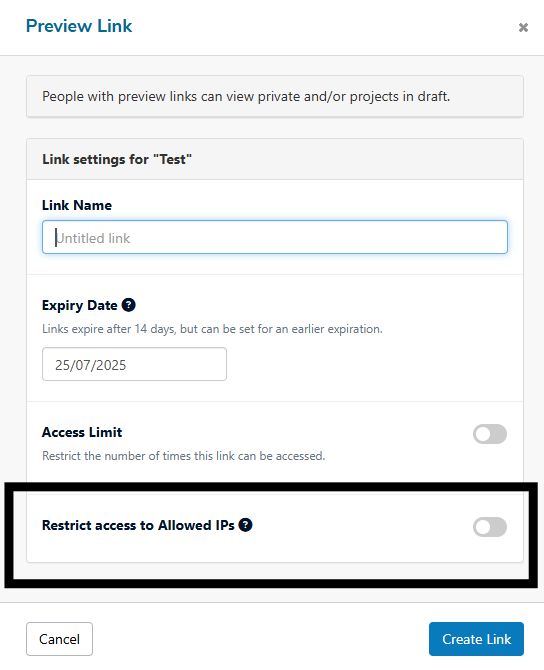
Using IP Restrictions in the Preview Link Modal

Once IP addresses are added to the allow list, you can restrict preview link access directly from the modal.

To enable this:

  1. Navigate to Dashboard > Projects.
  2. Select Preview Link for the desired project.
  3. Create a new link or edit an existing one.

If a whitelist has been configured, you'll see a toggle labeled:

"Restrict access to whitelisted IPs only"
  • Enabled: Only users accessing the preview link from an approved IP will be granted access.
  • Disabled: The preview link remains publicly accessible to anyone who has the link.

Important Notes: If no IP addresses have been added to the whitelist, this toggle will not appear.