Once you've made changes to the content of a page, you have a few options for saving and publishing it.

SPP's publishing system lets you save your changes in 'draft' and come back to them later. Once your content is ready to go, you can make your changes live by publishing the page.

Alternatively, you can schedule your changes to be published automatically at a future date and time.

Every time you save or publish changes, a version of the page is created and saved in SPP's version control system. If needed, you can view and compare previous versions of the page.

Premium subscribers can also use the approval workflow features to control which users have the ability to publish changes.

Key actions

When a new page is added to a Site, a draft version is created which allows Users to make content edits before a page is published. The draft page is added to the Drafts folder in the Sitemap, until it is published and made live.

Users can also make draft edits to pages that are already live by saving a new, unpublished version of the page. This allows content to be worked on ‘behind the scenes’ until the draft version is ready to be published to the public.

To make draft edits to a new, unpublished page or an existing, published page:

  1. Make content edits to the draft page as required
  2. Open the Publishing Panel by selecting the Save function on the Toolbar (or selecting the Edit function on the Toolbar if the page is not in Edit Mode)
  3. Choose the green Save Changes button from the Publishing Panel. This will update the contents of a new draft page or create a new, unpublished version of a live page.

Users will be alerted that they are viewing a draft page or draft changes with the following alerts being displayed:

  • ‘Draft’ pages - this page is currently in draft mode.

  • Draft changes to a production version - This page is newer than what appears to visitors on your live site.


User Tip

Choose the ‘Save Changes’ option from the Publishing Pane when making edits, rather than ‘Publish’ or ‘Submit to Workflow’ until all final edits are completed. This will reduce the number of page versions created and avoid confusion and noise associated with Workflows (if enabled).

Once all content edits have been finalised on a draft project page, the project can be published to make it ‘go live’.

To publish a draft project:

While In Edit Mode:

  1. Navigate to the Project Page and Select the Save function in the Toolbar (this will appear where the Edit function is when not in Edit Mode)
  2. Select the blue Publish Page or Submit to Workflow button in the Publishing Panel (this function will depend on the User’s publishing permissions).

While out of Edit Mode:

  1. Navigate to the draft Project Page.
  2. Select the Approve Version or Submit to Workflow button in the draft notification message.

Once ‘draft’ content edits have been finalised, changes can be published and made live.

There are two ways to publish draft content changes:

Method 1: Publishing Panel

  1. Navigate to the target ‘draft’ page or published page as required
  2. Open the Publishing Panel by selecting the Save function on the Toolbar (or selecting the Edit function on the Toolbar if the page is not in Edit Mode)
  3. Choose the blue Publish Changes or Submit changes to Workflow button from the Publishing Panel (this function on the User’s publishing rights).


Method 2: Draft Notification Message

  1. Navigate to the target draft project page. The draft project page will display a notification ‘This Project is currently in Draft’ and provide an option to Approve version (or Submit to Workflow)
  2. Select the Approve Version (or Submit to Workflow) button in the draft notification message.


User Tip

Users can add notes to each version in the Publishing Panel to make it clear what changes have been made to a page. These will be visible in the Versions Panel and in any Workflow notifications that are sent (if enabled).

Draft edits can be abandoned by Users who no longer want their edits to be saved. To discard changes, navigate to the Publishing Panel and choose the red Discard Changes button after making content edits. This will undo any changes made in the editing session and revert to the previously saved page version and its content.


Draft pages can also be removed if they are no longer needed. To discard a draft page, navigate to the Publishing Panel and select the red Discard Draft button to delete the draft page and all of its content.


Warning

While the Discard Changes (on published pages) and Discard Draft (on draft pages) functions appear similar in the Publishing Panel, be aware that the Discard Draft option will permanently delete the entire draft page, not just the edits that have just been made as would happen when selecting the Discard Changes option.

The launch of a new page or updates to an existing page can be scheduled to publish at any time or date.

This feature is particularly useful if you need to send multiple drafts or new versions live at the same time or publish changes outside of business hours.

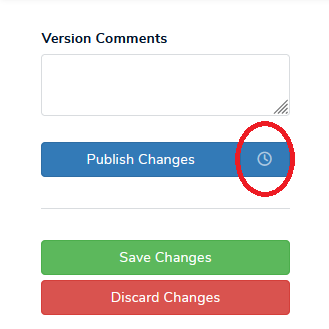
To schedule publishing, open the Publishing Panel in the same way you would when manually publishing a page. Then click the clock icon next to the Publish changes button.

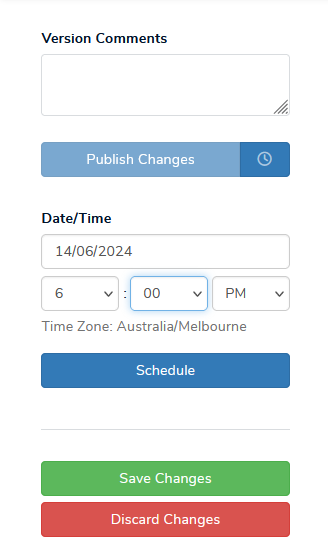
This will present options to set the specific date and time you would like the draft page or new version to be published. It will automatically be configured to the timezone of your site.

Set the desired date and time and select the Schedule button.

After this has been done, a notification will appear on the page detailing the scheduled date and time.

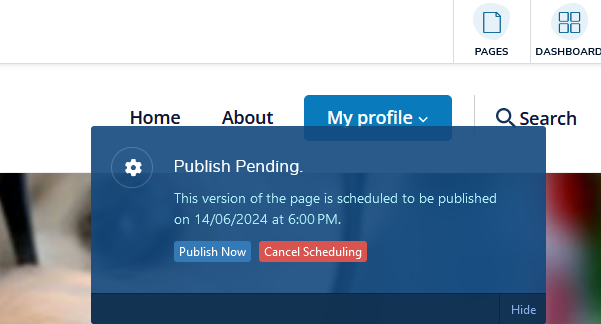
You also have the option to publish the page immediately by selecting the Publish Now button or can cancel the scheduled publish by selecting the Cancel Scheduling button.

Cancelling the scheduling will keep the page in a draft state until it is ready to be published again.

Scheduling with Workflows Enabled

If you have Approvals Workflows enabled on your site and do not have publishing rights, your scheduled publishing will need to be sent to an Approver (e.g. Project Lead) to approve the page.

If they do not approve the page prior to the proposed schedule publishing date, the page will not be published until after it is approved.

For sites with workflows enabled, you can set up a workflow simply by assigning Users to various user roles. By default, this can be done on a project level by assigning both a Project Lead and a Project Author.

As a Project Author does not have publishing rights, they will need to submit all of their changes to the Project Lead for review and publishing.

If you are assigned as a Project Lead and other Users have submitted their proposed changes to you via a Workflow, you can view a list of all workflow requests in the Workflow area of the Dashboard.