Your site consists of many web pages presenting content and participation activities to your audience. This includes project pages, sub-pages, and general pages you add to your site.

Page Types

  • Project page - Creates the main landing page for a project. Project pages get automatically created when you launch a new project.
  • Project subpage - Adds a secondary page to the main project page to provide additional project information. You can create Project Subpages manually as needed.
  • News page - Adds a page specific for news content that works with the Newsfeed tool. You can create project News pages manually as needed.
    • 💡NOTE: Public Date/Time is not the actual publishing date of the page but serves to display a specific date in the news page header.
  • Event page - Adds a page specific for event content that works with the Events tool and includes an image, map, and optional call to action button. You can create project Event pages manually as needed.
  • Team page - Adds a page specific for team content, can serve as a centralised hub for organising and managing multiple projects within a specific team (department).
    • 💡NOTE: You cannot place a Project page within a Teams page.
  • Forum page - Adds a project subpage containing a Conversation tool. Forum pages get automatically created when you add a Forum tool to any project page.
  • Site subpage - Adds a secondary page to the site to provide additional content (e.g. About, Privacy, Terms of Use, etc.). Site administrators manually create site subpages pages, which appear in the site's top navigation by default.

Add a new page

When you create a new page it is created in an unpublished draft for you to work on. You can access your draft pages by click on the Page button at the top right of your Toolbar, or in the Sitemap by opening the Drafts folder. Once you publish the page, it will move into your Sitemap and will be visible to your audience.


Adding a New Page: When creating a new page for your site or project,

  1. Click the Pages button at the top-right of the toolbar.
  2. Select the desired page type (e.g., Project Subpage).
  3. Fill out the form with required attributes like page name, URL slug, and location.
  4. Click 'Save' at the bottom-right to create the page and enter edit mode. If you click 'Publish' instead of 'Save'; this will make your page live straight away; however, as your page won't have any content we don't recommend doing this.
    • If you want to abandon the page creation process, click the 'Discard' button.

Warning

Please note: Project pages cannot be converted in to Sub-Pages and vice-versa. If you pick the wrong page type by mistake or change your mind and need to change from one to another, you will need to start the new and correct page type and use the clipboard function to copy and paste your blocks from one page to another. Once set, delete the original page and continue with the copy in the right page type.

Delete a page

You can delete pages you no longer want on your site.


To delete a page:

  1. Navigate to the Dashboard > Sitemap, and click the page name in the list. Alternatively, you can open the page and click "Settings" at the top-left of the Toolbar.
  2. Choose Delete Page from the menu.
  3. Confirm by clicking the Delete in the pop-up window.

Please note that if the page associated sub-pages, move or delete them before proceeding with the deletion.

Unpublish a page

If you've accidentally published a page and want to unpublish it:

  1. Open the Sitemap from the Dashboard.
  2. Click the page name you wish to unpublish.
  3. Click Move to Drafts from the menu to send the page back to the Drafts folder and unpublish it from your site.

Be sure to remove any links to a page you unpublish to ensure there are no broken links.

🎯Key Actions

Page attributes provide meta-information about a page and determine how it looks, where it lives on your site, who has access to it, etc.

You can adjust many attributes manually while the system automatically sets others.

Page attributes vary between page types and may include:

  • Page name - Sets the page's title, used in the Sitemap and displayed to visitors in their web browser.
  • URL slug - Sets the URL or web address used to access the page. By default, the URL gets populated from the Page's title, but users can adjust this (shorter URLs are best).
  • Page template - Sets the content layout of a page.
  • Page location - Sets the 'parent' page, which a subpage will be nested under within the Sitemap.
  • Exclude from Nav - Toggles the ability to show the page in a navigation menu. Depending on the page type, the page may appear in a site's global, top menu or within the Sub Nav tool.
  • Include in Footer - Toggles the ability to show a Site Subpage in the global footer area of a site.

To view and modify page attributes, click the Settings button at the top-left of Toolbar. The Details section of the Settings panel will show all available page attributes.

To edit a page attribute:

You can view all pages on your site in the Sitemap area of the Dashboard, which provides a holistic view of all your pages.

Within the Sitemap, you can search for pages on your site, change the order of pages, un-publish pages, access draft pages, edit a page's attributes, etc.

Pages can be grouped in the Sitemap and are shown in their

hierarchical order. For example, project subpages are always 'nested'

under project pages, which you can view by clicking the + icon next to the project name.

To better manage Draft pages which can become messy when there are many users starting different projects, we’ve added two ways to clean up accumulating drafts.

One option deletes drafts that haven’t been given a title and have been inactive for three days, the other option deletes drafts that may have a title and/or content but have been inactive for 90 days.

* Please be mindful when using this function, most drafts of this type are random pages that have been created and forgotten about and therefore can be safely removed but we recommend checking with your colleagues before performing this action so they don't lose their work, particularly if using the "Delete Old Drafts" option as these pages may have content in them. *

To bulk remove Draft pages:

  1. Navigate to Dashboard --> Sitemap and click on MANAGE DRAFT PAGES in the upper righthand corner.
  2. Review the options:
    1. Delete Untitled Drafts - This will delete drafts with no title and no activity for the last 3 days
    2. Delete Old Drafts - This will delete any draft that has been inactive for more than 90 days
  3. Confirm the action by clicking the desired Delete from the popup window.

You may have situations where you want to change the page type or reuse content from an existing page.

It is not possible to copy a page in it's entirety. The best method to achieve this outcome is to create a new page then move the content blocks across from the old page to the new page using the clipboard.

Pages on your site are controlled by user permissions, meaning they are only accessible to users assigned to the specific project they belong to.

Site Administrators can see all pages and pages that pertain to the site as a whole.
If you want to restrict certain pages in your public projects, you can add password protection to keep pages private. Of course, you can also restrict access to the entire project and its pages , which we cover in our Managing Projects guide.

You can share a draft page with another user on your site for review or collaboration.

Option 1:

To share a Project using the Preview User Share Link

  1. Go to Dashboard, navigate to "Projects"
  2. Find your project from the list
  3. Select "Preview Link"
  4. Select "Create Link"

You can now share this link with anyone without needing to assign them a role. This will give preview-only access to the project.

Option 2:

To share a Project Page, Project Subpage, News Page or Events Page with a user, you must first assign them to the project and give them an appropriate User Role (such as Project Author or Preview User).

You will then need to send them the URL of the draft page so they can access it.

The location attribute determines where a subpage such as a Project Subpage, News page or Events page is nested. Usually, you will set this location when a page is first created but you can adjust this at any time by following these steps:


  1. Navigate to the target subpage, and click the Settings button on the Toolbar to open the settings menu.
  2. Click Location from the settings menu.
  3. Click the blue Choose Location to open the Sitemap.
  4. Select the parent page (e.g. Project Page) from the Sitemap to associate the subpage with the appropriate parent page.


💡 User Tip

Your visitors can see a page's location and hierarchy in the 'breadcrumb' element at the top of each page and use this to navigate your pages. The Subnav tool automatically lists your subpages and makes it easy for visitors to navigate between them.

You can link pages together by creating simple hyperlinks in text content or use more visual tools such as Feature Grid, Button, and Key Links. The SubNav tool automatically displays the subpages of a project when added to a page.

You can make links directly in the content areas of any tools that display a 'chain' icon.

To create a link to another page:

  1. Navigate to the target page and put the page into edit mode.
  2. Click the relevant bock to open the Block Settings.
  3. In the appropriate content area, highlight the selected text you want to link.
  4. Click the 'chain icon', then select Insert Link to open the Insert Link window.
  5. Under the URL field, click the 'site tree' icon to open a view of the Site Map. This field will be visible in some tools straight away, so you can skip steps 3 and 4.
  6. Click the name of the page you want to link to, then click Insert to create the link.

💡 User Tip

This method also lets you directly type the URL of a page on your site (or to an external site). However, we recommend you follow the instructions above and always choose your page from within the Sitemap. Otherwise, if the URL changes, for example, when a page moves from draft to live, the link will break.

Page templates determine the page's layout and where you can add content.


You can learn more about the available page templates and see examples in the page template gallery.

To change the template of a page:

  1. Navigate to the target page and select the Settings button from the Toolbar to open the Settings menu.
  2. Click Design from the Settings menu.
  3. Click the desired page template from the template list to preview the new template. To see all templates from the list, click 'expand.'
  4. When satisfied, click the 'Save' button at the bottom-right of the page to save the changes in draft, or 'Publish' to apply the changes to the live version.

When changing between page templates, you may notice that some of your content is no longer visible. For example, if you change from Right Sidebar to Narrow, content in the right sidebar area no longer appears.

To address this issue, revert to the previous template, close the Settings Panel (by clicking the Setting button from the Toolbar), and drag the content from the sidebar area to the main content area. Now when you change the page template to Narrow, your content will be visible.

The URL slug of a page is the web address that visitors can use to access the page. You will set the URL of a page when the page is created but can change this at any time.

The URL is essential as you will share this publically to drive traffic to your page. You may even send this out in printed materials, so we strongly recommend you keep it as short as possible.

The URL of a page is formed by taking the base name of your site (e.g. yoursite.com) and appending /project name. URLs of subpages display as: yoursite.com/projectname/pagename.

To change the URL of a page:

  1. Navigate to the target page and click the Settings button from the Toolbar.
  2. In the Details section of the Settings menu, scroll down until you see the URL Slug attribute listed.
  3. Click the 'pencil' icon next to the URL Slug attribute and edit the URL as required. Note that a URL may not contain any spaces.
  4. Confirm the change by clicking the 'Save' button to save the changes in draft, or 'Publish' to apply the changes to the live version.

⚠️ Caution

If you have already communicated the URL of a page externally (e.g. you've published it in an email or newsletter) and then change the URL, visitors will have issues finding the page and see a page not found error.

Once you have set the URL of a page, you may have situations where you want users to be able to access the same page via another URL or redirect.

When you add an additional URL, visitors to your site will be able to access the target page from both the original URL that you created when setting up the project as well as the new URL you are adding in the project settings.

To add a URL to a page:

  1. Navigate to the target page and click the Settings button from the Toolbar.
  2. In the page settings menu select Location,
  3. Select Add URL, then input the additional URL into the Path field
  4. Confirm the change by clicking the 'Save Changes' button

Confirm the change by clicking the 'Save' button to save the changes

💡 User Tip

The Page settings will allow you to set up redirects to pages hosted on your engagement site. If you are wanting to set up a redirect using an external domain (for example your corporate website) please reach out to us via the support desk.


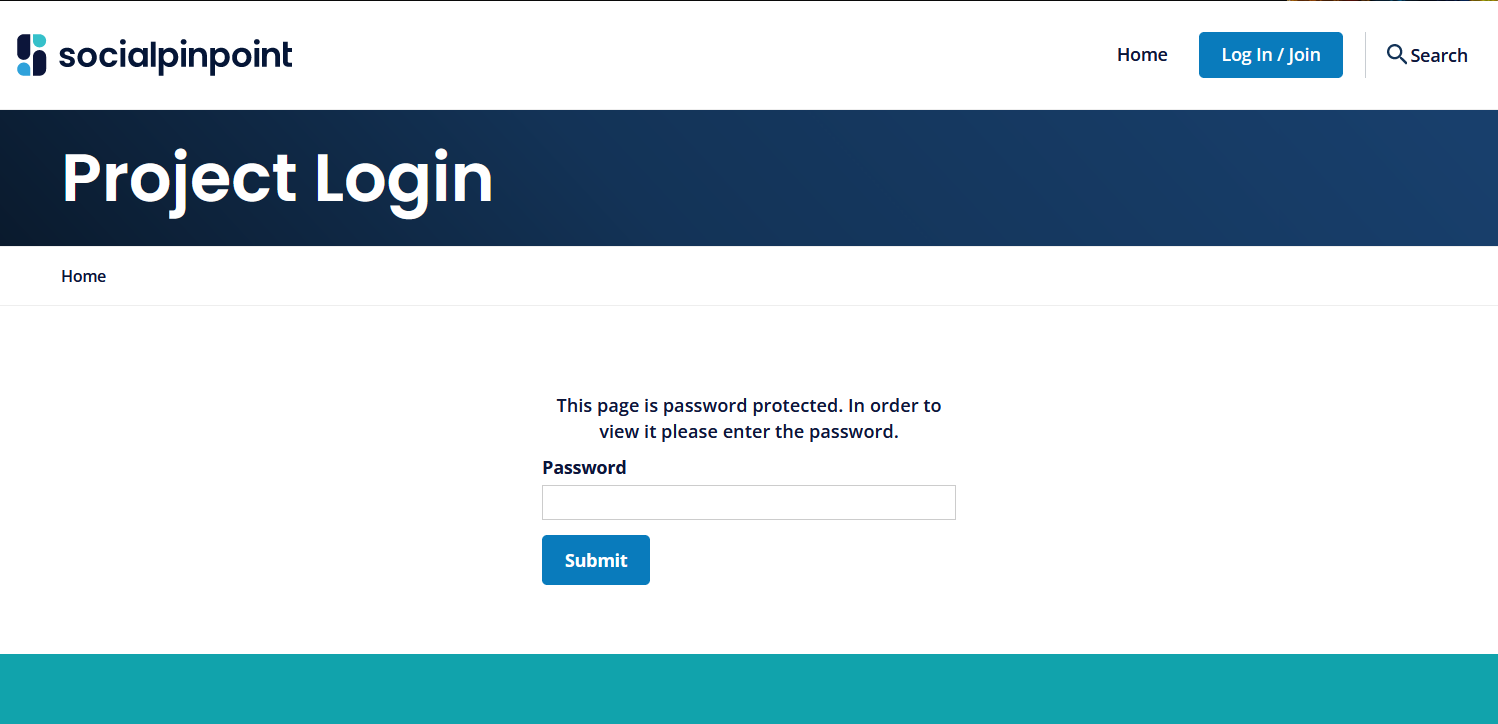
You can limit access to any page on your site by setting up password protection. This feature implements a basic authentication screen that prompts visitors to enter a generic password. If the visitor to the page provides the correct password, they can view the contents of that page.

For example, you can add password protection to a sub-page within a public project that is only accessible to key stakeholders related to that project.

⚠️ Warning

Files added to password-protected pages are still accessible to anyone with the URL of the file, meaning your content may not be entirely confidential. If you require greater access control, you should set up a 'Private' Project instead.

You can manage password protection for projects and pages from the HiVE Settings area of the Dashboard. Here you can view a list of your password protected pages, add new pages, and remove existing password protection.

You can automatically apply the password protection feature to all of a page's 'child' pages (i.e. pages published under another page in the Site Map hierarchy) or manage each page individually.

To add a new password protected page:

  1. Navigate to Dashboard --> HiVE Settings --> Password Protection (under the Projects heading)
  2. Click the 'Choose a Page' link from the Page heading
  3. Choose the page to add the password protection to from the Sitemap list
  4. To include the password protection for any child pages of the target page, click the 'Include Sub-pages' checkbox
  5. Enter a password into the Password field, and click the Submit button.

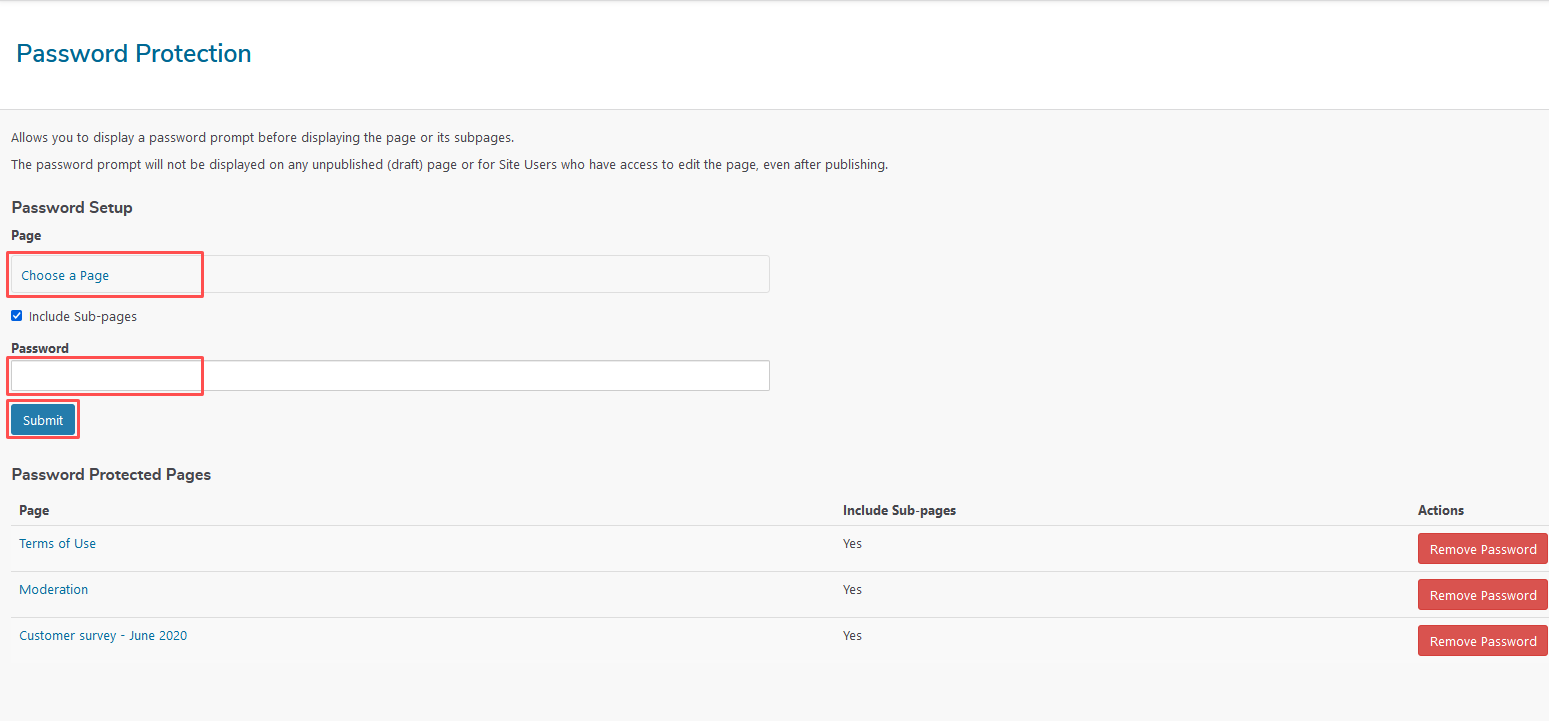
Your page will appear in the list of Password Protected Pages. You can now share the URL of the page and the generic password with those you want to access.

To remove the password protection feature from a page, click the 'Remove Password' button next to its name in the Password Protected Pages list.

You cannot change the password of an existing password protected page. Remove the existing password and create a new password if you need to modify the password.

If you apply the password-protection feature to a Project Page before you publish the page, an automatic email notification will not be sent to registered members notifying them of the project.

However, if you add the password-protection after a Project Page is published, the email notification will still send.

In some cases, the order pages display in the Sitemap determines how your content appears to your visitors.

Examples include the order that projects appear in your project lists (if set to the 'manual' option) or the order that pages appear in the Subnav tool.

To reorder pages in the Sitemap:

  1. Open the Sitemap from either the Dashboard or by clicking the Pages button in the Toolbar.
  2. Click the page you want to move from the page list, drag it to the desired location, and release your mouse button.
  3. A confirmation message will appear, letting you know the page order has been saved successfully.

You can only change the display order of pages within the same hierarchical level of the Sitemap (e.g. reorder subpages within a project). If you want to move a page to a different level (e.g. move a subpage to another project), see the instructions to Change the location of a subpage.

Pages you add to your project or site may automatically appear in a navigation menu depending on its page type.

For example, when you add a Site Subpage, it will automatically display in the top-level navigation of your site, which is visible across all pages. While this is desirable for core pages like an 'About' page, it may not be appropriate for other pages, and you may want to remove them from the menu.

Likewise, adding a Project Subpage will automatically appear in the Sub Nav tool (if used). However, you may only want to show the key pages in this menu.

To add or remove a page from a navigation menu:

  1. Navigate to the target page and click the Settings button from the Toolbar.
  2. In the Details section of the Settings menu, scroll down until you see the 'Exclude from Nav' attribute, and ensure this is checked on or off as appropriate.
  3. Confirm the change by clicking the 'Save' button to save the changes in draft, or 'Publish' to apply the changes to the live version.

You can optimise your pages to help search engines like Google or Bing find your content and list it in a desirable way.

You can adjust the following meta-tags:

  • Meta Title - Allows you to override the page name to control how your page title is listed in search engine results.
  • Meta Description - Allows you to override the page description to control how your page description is listed in search engine results.
  • Meta Keywords - Allows you to add keywords to your page to help search engines match relevant search terms.
  • Header Extra Content - Adds additional code or content into the page header.
  • Exclude from sitemap.xml - Allows the page to be included in the sitemap.xml, helping search engines to discover and index new pages of a Site faster. It is recommended to keep this set to 'on'.

To edit the 'meta-tags' of a page:

  1. Navigate to the target page and click the Settings button from the Toolbar
  2. Click SEO from the menu to open the list of meta-tags
  3. Edit the meta-tags as required.
  4. When finished, click the 'Save' button to save the changes in draft or the 'Publish' button to make your changes go live.

💡 User Tip

Meta-tags like keywords are no longer critical for good Search Engine Optimisation (SEO) as they used to be. Instead, modern search engines rely more heavily on scanning the content of your page so make sure your content contains relevant search terms.